Forums on Intune, SCCM, and Windows 11

Welcome to the forums. Register a free account today to become a member! Once signed in, you'll be able to participate on this site by adding your topics and posts, as well as connect with other members through your own private inbox!

PENDING Migrate Site Server role to other server

  • Thread starter Thread starter Marcent
  • Start date Start date
  • Replies Replies 5
  • Views Views 2K

Marcent

New Member
Messages
4
Reaction score
0
Points
1
Hi Prajwal,

I'm planning to migrate the Site Server role from a W2012 VM to a new W2019 VM.
There seems to be almost zero manuals how to migrate a Site Server on the web.

This is a big SCCM 2303 environment so it would be useless to build a new environment.(that would take months)
Instead we choose to replace all the W2012 VM's with W2019 VM's.
I don't want to do an in-place-upgrade from W2012 Site Server to W2019 Site Server but start with a fresh server.

The only option I can think of is create High Availability with a passive Site Server (W2019)and active Site Server (W2012).
Then promote the new W2019 VM to active Site Server and the W2012 to passive Site Server.
And then later on decomission the old W2012 VM.
The SCCM version is 2303.

Regards,

Marcent
Hi,

Have recently done this myself using site server in passive mode then promote the passive server. It's quite seamless.
 
I want to move the Content Library to a network share.
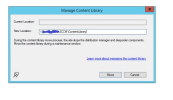
But when I open Manage Content Library on the Site Server the Current Location is grayed out (pic1)
The Site Server is NOT a DP.
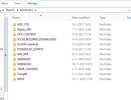
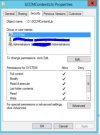
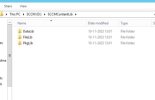
In the other pics there is the folder structure and security rights.
But why is it still grayed out ?

On the MS sites there is really too little information about this.
 

Attachments

  • content1.JPG
    content1.JPG
    31 KB · Views: 6
  • content2.JPG
    content2.JPG
    36.3 KB · Views: 6
  • content3.JPG
    content3.JPG
    40.8 KB · Views: 5
  • content4.JPG
    content4.JPG
    23.3 KB · Views: 4
  • content5.JPG
    content5.JPG
    71.3 KB · Views: 4
Hi guys,

The answer from Microsoft about SCCM2303 is:
I took the ownership of your request regarding the Content Library Current Location being grayed out.
This is the expected behaviour when the content library is located on the Site Server (default).

1)So the current location is grayed out, because Site Server
2)Create a networkshare and share and NTFS permissions for the SiteServer is full control
3)Create a folder in the networkshare
4)In New Location fill in \\yourservername\yourshare\yourfolder

Look at my screenshot 1 how it should be,
At screenshot 2 is the result:

Case Closed :)
 

Attachments

  • newcontent.png
    newcontent.png
    73.4 KB · Views: 6
  • newcontent2.JPG
    newcontent2.JPG
    31.1 KB · Views: 6
Check the below steps that I would recommend for migrating the Site Server role from a Windows 2012 server to a new Windows 2019 server in your SCCM environment:
  1. Install SCCM on the new Windows 2019 server and configure it as a secondary site server. Make sure all SCCM and SQL prerequisites are met.
  2. Run the GeneratePreloadPackages.ps1 script on the primary site server to generate the preload packages for client push installation.
  3. Copy the preload packages from the primary to the new secondary site server.
  4. Configure client push installation settings on the new secondary site server to point clients to the preload packages location.
  5. Run some baseline client push installations from the new secondary site server to validate that everything is working properly.
  6. Place the primary site server into maintenance mode.
  7. Run the Promote-CMSiteSystemServer cmdlet on the primary to promote the new Windows 2019 server as the new primary site server.
  8. Run PostInstallSteps.ps1 on the new primary site server to complete the final configuration steps.
  9. Verify clients are receiving policies from the new primary site server.
  10. Decommission the old Windows 2012 primary site server once you've validated that clients are functioning as expected from the new server.

Also, you can use server migration tools like ShareGate or Gs Richcopy 360 to speed the migration process in a few steps and this can save so much time .
 
Back
Top